 |
|---|
|
| Store | company info | contact us | customer login | view cart |
The W-3’s may be printed as part of the complete W-2 set for a Client, or individually. To print them individually:
Choose the Reports link.
Choose Year end reports | W-2 | Print regular (unchanged) W-2s.

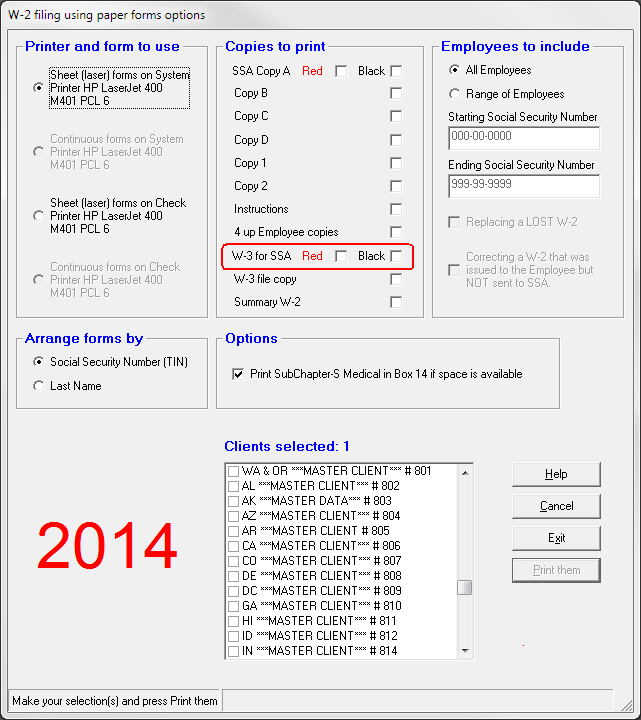
The W-2 filing using paper forms options window appears.

Set up the print job using this window.
The required information appears in blue.
Choose a printer and form combination from the Printer and form to use section. It shows both the System and Check printer, and the type of forms they support. Click on the setting you wish.
Note the options Red and Black beside W-3 for SSA. SSA accepts our computer-generated W-2 and W-3 forms printed entirely in black ink using our Forms on a Disk™ option.
Some people prefer to file their SSA copies on red-ink paper even though it is not required with our SSA-approved computer-generated images. If you have purchased the W-2 Forms on a Disk™ but want to print the SSA copies in Red, check the Red box, otherwise check the Black box.
Choose either W-3 for SSA Red or W-3 for SSA Black (only available when you use form images)
You also can add the option to print a non-fileable file copy of From W-3 when you use form images.
Use the Select clients to process list box to tell Industrial Strength Payroll which Clients to print. To select a Client, use the up and down arrows on the right of the list box to scroll through the Clients. They are in client-number order. When the desired Client appears, click on the name to have it turn blue. A checkmark or x (depending on your system settings) appears beside every Client that is chosen.
The Clients selected area shows the number of Clients that you have selected to print.
The Print them button becomes available once you have selected at least 1 Client and 1 copy to print.
Once the setup is complete, click Print them.