|
|
| Store | company info | contact us | customer login | view cart |
The Batch method is the preferred method to use when you want to record a detailed series of transactions for a group of employees over a period of time. Employees, checks and pay periods can be processed in any order. Productivity is increased by a special Copy Check function that duplicates an employee’s check. Editing transactions is facilitated by a Find feature that locates a transaction by check number, employee name, and transaction number. Any transaction can be edited or deleted from the batch. A special Batch Input Register groups employees by last name, producing a form of "Payroll Card". The permanent payroll files are not updated until you post the batch.
The payroll is recorded as of the Check Date that you enter into each transaction.
The pay period beginning and ending dates are adjusted automatically as you save a transaction. The Check Date is compared to the current range of dates. If the check date lies outside of this range, the range is widened to include the check date. A pay period always begins on the 1st day of the month, and ends on the last day.
Here's how to record after the fact payroll using the ATF Batch method.
To begin choose the Calculations link.
If you’re continuing an ATF batch job,
Click Work on this batch,
otherwise
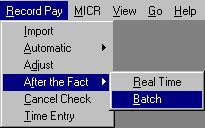
Then click Start a new batch | After the Fact – Batch Mode.
You work with the Payroll Recording Window.
There are four steps to Batch ATF recording:
Add checks to the batch file.
Verify the input.
Make necessary changes, additions or deletions.
Post the transactions to the permanent files.
Begin by recording each check. Here are the steps:
Retrieve the employee to be processed.
If you don’t want to pay this employee, press New.
Type the Check Number (optional but highly recommended).
Type the Check Date.
Record all of the Earnings, Taxes and Deductions.
or
Press the Copy button or F4 to copy the last check you saved for this employee.
Press Compute.
Industrial Strength Payroll automatically computes FICA and Medicare when you press Compute. If the result differs from the amount(s) you entered, the program pauses, showing this dialog.
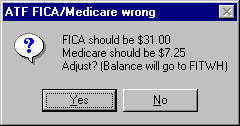
Click the Yes button to have Industrial Strength Payroll adjust FICA and Medicare to their correct values (recommended). The balance will be either added to or subtracted from the FIT withheld.
![]()
It is very important that you allow this adjustment, even if it means having to file a 941-X to correct prior-quarter reporting errors. FICA and Medicare are simple multiplications. As such, both IRS and SSA expect you to be able to do them accurately. Except for whole-dollar reporting, there is very little tolerance on the FICA and Medicare lines of Form 941. Our software always does an exact calculation that cannot be edited. Therefore, you are likely to have an amount owing on Form 941 if you do not correct the computations. Even if you prepare and submit the 941 by hand, the W-3 and W-2s will likely be out of tolerance. This prompts an "Please explain" letter from SSA and/or IRS.
Industrial Strength Payroll automatically computes SDI if applicable when you press Compute. If the result differs from the amount(s) you entered, the program pauses. Select Yes to accept the computed values (recommended). Any balance is posted to SIT Withheld.
Industrial Strength Payroll waits for your confirmation.
Review the information on the screen.
If you didn’t want to pay this employee, press New.
If it is correct, press Post to accept. The employee’s records are updated.
If it is incorrect navigate to and change the error, and press Compute again.
Industrial Strength Payroll expects that you want to enter another check for this employee, so it returns to the Check Number field. Click New to end this employee and begin a new one, or Stop to end input.
Verify the Input.
There are 3 ways to check your input:
By pressing the Forward and Back buttons and reviewing each transaction on the screen.
By printing a Check Register, or an Input Register. Choose Print.
By viewing a register on the screen. Press View.
Make necessary changes, additions or deletions.
You can retrieve the records by pressing on the Back and Forward buttons, or by using the Find feature.
The Find feature searches for transactions that either match a Check Number, a Transaction Number, or part of the Last Name. You activate Find by choosing Edit | Find, or by pressing the Find button.
Next choose the way you want to search, enter the search parameter and click OK.
To repeat a find, press F3.
With the record on the screen, press Edit and make the changes. Press Compute, then Save to save the change. Press Stop or New to discard the changes.
If there is a transaction that you want to delete entirely, press Delete with it on the screen. A message appears in the lower right side of the check indicating that the transaction has been deleted.
If you delete a transaction in error, retrieve it as above, then press Undo. The delete message disappears.
Post the transactions to the permanent files.
Press the Stop button to return to the Current Job window.
Press the Post this batch button.
All valid (= not deleted) transactions are added to the permanent records. When done, you see this message confirming what was done. On this screen, the term "Records skipped" refers to deleted transactions.
The batch is now closed. It can never be brought back.