|
|
| Store | company info | contact us | customer login | view cart |
Form 941 and Schedule B - Form 941 are available for any quarter. Pages 1 and 2 of Form 941 print for all 941 Clients. The Schedule B - Form 941 prints for Clients who are shown as semi-weekly depositors in their Client Master record, and who pass the IRS’ reporting threshold for Form 941.
To print Form 941,
Choose the Reports link.
Click the Print button.
Choose 941.
The Specifications for Form 941 window appears.

Select a Quarter from the Reporting period list.
Enter the number of copies in Copies to Print.
Press Next.
You see Quarterly Federal Tax Return Worksheet. This facsimile of Form 941 makes it easy to maneuver around the form, even if you use enlarged text. The output will be an actual Form 941.

You can change anything you want in Part 1 but we strongly recommend against changing any of the wage, withholding, FICA or Medicare. If you change these areas the Forms 941 will not reconcile to the W-3 as required. You will need to edit the W-2 file and will not be able to efile.
Record any deposits and credits in the Total deposits line.
Press the Page 2 button to go to page 2.
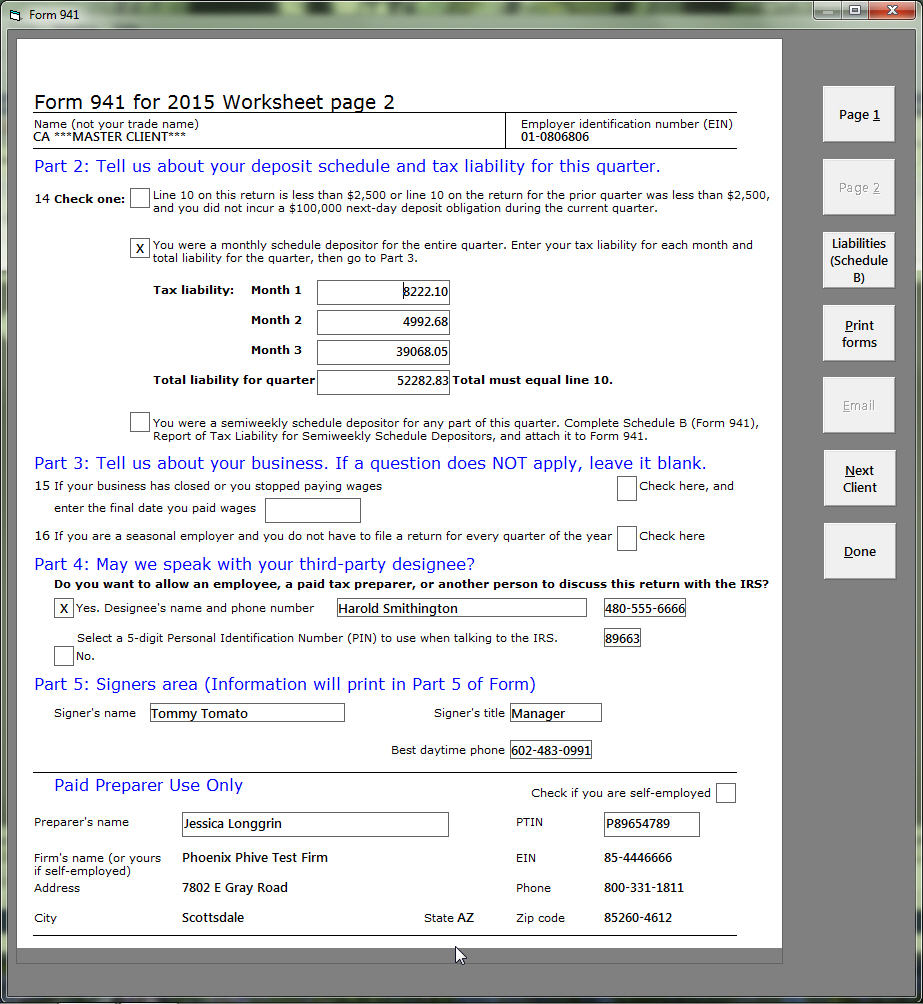
Many people think that Part 2 is for reporting payments. The wording on the form clearly shows this interpretation is not correct. The purpose of Part 2 is for reporting the deposit schedule and the Liabilities if required. The IRS gets payment information from the EFTPS system.
Part 2, Line 14 is governed by very specific instructions which the software adheres to faithfully. Here are the particulars:
You cannot click any of the checkboxes. They are controlled by either a) the Total taxes after adjustments on Page 1, or b) the Type of Filer in the client's master record as follows.
The IRS interpretation of the US Tax Code sets a minimum threshold for reporting Liabilities. If the Total taxes after adjustments from Page 1 fall below this threshold and did not exceed $100,000 in either this quarter or the previous one, you don't have to and must not report liabilities. It doesn't matter if you incurred liabilities or made deposits, you don't report anything here.
In cases where you do need to report liabilities, the software marks either the second box and places values in the Month 1, Month 1, Month 3 and Total liability for quarter as shown above, or it checks the semiweekly deposit schedule box.
You change the values in for the monthly liabilities by clicking on the value you want to change. This opens the Daily liability schedule window in the month you want to change.
Use the Liabilities (Schedule B) button to change any of the liabilities.
Part 3 is self-explanatory.
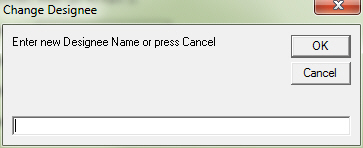
Part 4 - third-party designee either is marked No, or is marked Yes and filled with the information you entered here in the Firm. If you wish to use someone else for this specific return, click on the designee's name and put the name in the popup that appears.
To change the PIN, click on the PIN box and record the new PIN in the popup.
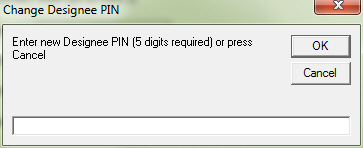
These changes are discarded when this form prints.
Part 5 is taken from the Client's record.
The Paid Preparer section comes from the Firm file. The only possible changes are the preparer's name and PTIN. Again, such changes are temporary for this return only. Use the Firm station to make permanent changes to the Firm.
Click Print forms when ready.
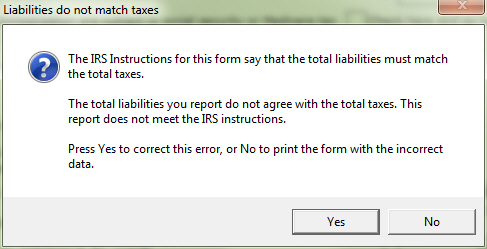
The software compares the reported liabilities with the actual liability from Line 10. They must match. You see this message if they do not agree.
The software creates and saves a PDF file in the current year, then prints the file to the Primary Printer.
Press the Done button at any time to quit this procedure.
Frequently-asked Questions:
Why doesn’t the Liability print? Click here.
How can I change the quarterly Liability? Click here.
I need to specify a third-party designee? Click here.
How do I enter Paid Preparer information? Click here.
How do I print the Client’s signer information on the form? Click here.